Timing Calibration of a GNSS Receiver

GNSSGlobal navigation satellite system (GNSS): A general term describing any satellite constellation that provides positioning, navigation, and timing (PNT) services on a global or regional basis. See also is well-known for its ability to provide a position with sub-meter accuracy. However, it is less well-known that GNSS provides a very convenient way of obtaining nanosecond (or even sub-nanosecond) timing accuracy via a GNSS receiver. Indeed, in addition to the three spatial dimensions, GNSS enables the user to compute the clock bias and the drift of the receiver’s clock with respect to the atomic clock of the GNSS constellations. To perform this properly, it is necessary to first calibrate the GNSS receiver and the RF setup from the antenna to the receiver.
Precisely measuring the accuracy of the 1-PPS signal of a GNSS receiver can be challenging, especially as we are dealing with nanosecond uncertainties. The variability (atmospheric conditions, multipath, etc.) and unpredictability of live-sky signals prevent the manufacturer or the end user from calibrating equipment using these signals. RF circuitry and signal processing algorithms are also very sensitive to each signal’s frequency and modulation. Delays can vary up to several nanoseconds between each GNSS signal, which explains why the time synchronization needs to be assessed for each signal.
As a result, the best way to correctly measure the accuracy of a GNSS receiver is to use a well-calibrated GNSS simulator as a reference. A GNSS simulator allows the user to control every type of atmospheric effect and to reproduce a deterministic and repetitive signal. The simulator can also provide a 1-PPS signal for use as a reference for the device under test (DUT).
However, in this case the challenge is to measure and certify the accuracy of the GNSS simulator. The classical approach to generating simulated signals is to use real-time hardware (such as FPGAField-Programming Gate Array: an integrated circuit designed to be configured by a customer or a designer after manufacturing – hence the term field-programmable. See also) to synthesize each satellite signal (usually described as channels) in intermediate frequency (IF). The drawback of this approach is that each FPGA can only handle a limited number of channels, which therefore requires independently calibrating each cluster of satellites. This calibration process is laborious and a major source of errors.
One of the key advantages of the Orolia’s Skydel GNSS simulator is its ability to use the power of the GPU to generate digitally and in baseband each and every satellite signal (as well as multipath or interferences). With Skydel, all satellite signals on the same frequency band are synthesized together with the same hardware components from baseband to RF signal. Consequently, the Skydel simulator needs to be calibrated only once for the two GNSS bands, and the delay between each satellite signal on the same carrier is perfectly equal to zero.
Finally, the Skydel GNSS simulator has been designed from the start to be synchronized with an external reference clock and to easily synchronize an unlimited number of Skydel instances among themselves (for instance, synchronizing multiple antennae or multiple receivers).
This application note gives an overview of the typical timing configurations provided by the Skydel simulator and explains how the end user can accurately calibrate the simulator with its specific laboratory setup (RF cables, LNA, splitters, etc.).
Timing configurations
GPSDO Reference clock
The simplest way to use the Skydel GNSS simulator to calibrate a timing receiver is to set up a basic configuration that uses an Ettus X300 SDR equipped with a GPSDO clock inside. In this case, the GPSDO serves as both a 10 MHz and a 1 PPS reference clock.

For this configuration, we must select GPSDO as a reference clock in the X300 output settings.

With this configuration, the RF signal is synchronized with the 1 PPS output of the X300 radio.
External reference clock – single Skydel session
If the user wants to use an external reference clock for the GNSS simulator, it is also possible to synchronize the SDR (or multiple SDRs) with external 10 MHz and 1 PPS references. In this case, connect the 1 PPS input and reference input of each of the X300 SDRs to the corresponding outputs of the external clock. It is important to use strictly identical cables for each of these connections.

For this configuration, we must select External as a reference clock in the X300 settings, doing so for each SDR.

In the Global→ Synchronize simulators settings, we must configure the Skydel simulator as Master.

With this configuration, the RF signal is synchronized with the 1 PPS output of the reference clock. Note that, in this case, the 1 PPS outputs of your SDRs are deactivated as they are not synchronized with any signal.
External reference clock – multiple Skydel sessions
Finally, multiple Skydel sessions can be synchronized with one or more SDRs active in each session. The principle is the same as with a single Skydel session—we need to use an external reference clock to synchronize each of the SDR.

For this configuration, we must also select External as a reference clock in the X300 output settings for each SDR. In the Global→ Synchronize simulators settings, we must configure one of the Skydel simulator sessions as Master.
All of the remaining sessions must be configured as Slaves.

Similar to the configuration with a single Skydel instance, the RF signals are synchronized with the 1 PPS output of the reference clock.
Calibration procedure
Configuration Setup
The Skydel simulator is designed to provide a consistent PPS signal with an accuracy equal or better than 5 ns. This calibration is performed for each configuration described in this document and for each sampling rate selected on the SDR output.
However, the user may have a custom installation with RF cables, LNA, attenuators, and splitters between the RF output and the receiver under test. Each of these components adds a supplemental delay to the RF signal propagation that the user may need to evaluate. Furthermore, with good instrumentation, it is possible to achieve far better delay measurement accuracy (e.g., lower than 1 ns).
The procedure required to evaluate supplemental delays with the Skydel simulator with a high degree of precision is as follows:
First, the measurement setup requires an oscilloscope connected to both the 1 PPS reference and the RF signal where we need to assess the delay (for instance at the input of the receiver). While the following figure illustrates a configuration with an internal reference clock (GPSDO), it is applicable for the other configurations described in this document (i.e., the 1 PPS reference becomes the 1 PPS output of the external clock).

To measure the delay between the RF signal and the 1 PPS, it is then necessary to create a specific scenario on the Skydel simulator. The simplest way to measure the timing of the RF signal is to broadcast a single GPSGlobal Positioning System is a navigation satellite system. See also C/A satellite signal and to observe the transition between the last chip and the first chip of the modulation code. Thanks to the specific design of the Skydel simulator, each of the other GNSS signals will now be perfectly aligned with the C/A code.
Scenario description
Create a new scenario within Skydel and configure a new radio broadcasting-only GPS C/A signal on the output to be measured. In the Settings panel, select the output bandwidth that will be used to evaluate the timing receiver.
In the GPS→ General tab, uncheck the signal propagation delay option. Skydel will then simulate pseudoranges with a zero delay for each of the satellites, enabling it to accurately align the C/A code with the 1 PPS signal.

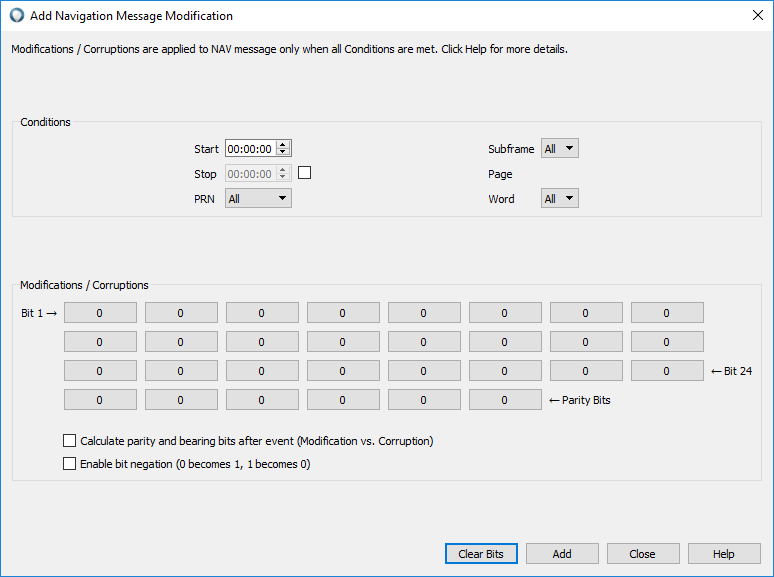
In the Message Modification→ NAV tab, add a new message modification on satellite #10. Set each of the bits to 0 (including parity bits) on all of the subframe as well as the word. With this modification, we are sure to have a 0/1 chip transition at the end of the modulation code (every ms).
In GPS→ Signals, unselect the RF signal for all satellite signals except PRN 10. (PRN10 is visible in the default configuration of Skydel and, as the last chip of the spreading code, it has the opposite sign of the first chip.)

In GPS→ Signal level, set the global signal power and GPS C/A code to the maximum (10 dB each); this should ensure that the RF signal is displayed on the oscilloscope.

Run the simulation and adjust the oscilloscope to display both the 1 PPS signal and the RF signal. We can now accurately measure the delay between the rising edge of the 1 PPS and the phase inversion of the RF signal. This helps us determine the delay for which to compensate on all future measurements with the same laboratory setup.

Note: Due to a limitation with the oscilloscope used here, the 1 PPS signal is not drawn. However, the 50% rising edge is aligned with the vertical dashed line on the figure. The plain line is synchronized with the phase inversion of the RF signal. In this example, we measure a fixed offset of 520 +/- 100 ps between 1 PPS and RF signals.
Conclusion
While GNSS has shown itself to be an indispensable system for positioning and navigation, it is also critical for a number of timing applications such as banking or energy generation and transmission. For these types of applications, an accurate characterization of the timing receiver is essential; consequently, the use of a GNSS simulator is key to achieving such accuracy.
The power of Orolia’s Skydel GNSS simulator is its ability to synthesize all GNSS signals in baseband, which means that all satellites signals on the same frequency band are perfectly synchronized among themselves. As a result, the system timing calibration—a complicated and expensive operation on other systems—is highly simplified on the Skydel simulator.
